Spheres
A sphere is a prevalent item in Final Fantasy X and Final Fantasy X-2 created using water infused with pyreflies. Spheres and the technology involved in their creation have many purposes in Spira, including serving as recording devices, keys, save spheres, equipment, and aiding in the creation of sports arenas. When a sphere is destroyed it dissolves into pyreflies.
Dresspheres act like job classes, giving unique abilities and appearances to the player characters. Characters can change dresspheres by moving from one node to another on the Garment Grid in combat.
Search Spheres locate treasures hidden throughout Besaid. Shinra's CommSpheres, placed throughout Spira in previous chapters, are the only means of advancing through Chapter 4, by communicating with people at their locations. Crimson Spheres are a type of movie sphere used to open the portal into the Den of Woe.
Spheres have gained new importance after Yevon's fall, and sphere hunting groups have sprung up to discover ancient recordings of Spira's concealed history. One such notorious sphere is known as the "Awesome Sphere".
Dress Spheres
Dresspheres (ドレスフィア, Doresufia?) are an integral part of the battle system in Final Fantasy X-2; each character has to choose a dressphere to use in battle, which roughly translates into a job system from previous Final Fantasy games; however, dresspheres are a little more encompassing than previous job systems.
Dresspheres determine the character's weapon, base stats, and appearance and there is no equipment to control these choices. Consequently, and perhaps fittingly, all of the equipment are some form of accessory.
Dresspheres need to be equipped in the character's Garment Grid to be used, and the player can change between dresspheres mid-battle by moving to a different node on the Garment Grid. Due to the game's New Game Plus function, it is possible to gain several of the same dressphere and equip them to the same Garment Grid, allowing gates to be activated while keeping the same job class.
During battle, a spherechange can be implemented at any time to change the current dressphere. This can be done to gain extra abilities from the Garment Grid, to activate the special dressphere, or just switching to a different job more suited for the particular enemy. Switching of dresspheres can be stopped by status effects.
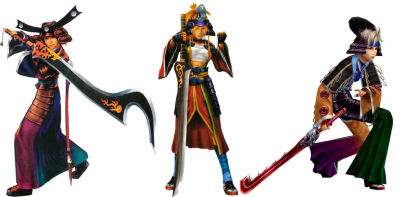
The weapons wielded by the characters while wearing some of the dresspheres—particularly Warrior, Samurai, Dark Knight, White Mage, Black Mage and Mascot—are weapons featured in Final Fantasy X. For instance, as Warrior, Yuna wields Tidus's Brotherhood sword. Another example is when, as a Samurai, Rikku wields a katana identical to Auron's.
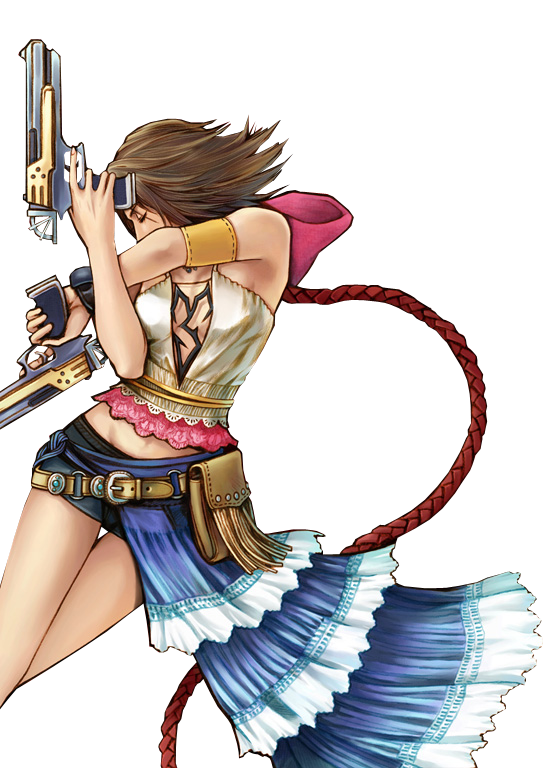
Gunner
Mastering Gunner requires 800 Ability Points. There is no accessory or Garment Grid that allows the player to use Gunplay outside of the Gunner dressphere.
In the original version, Gunner's Trigger Happy ability is known for its power when paired with the Cat Nip accessory. With the Cat Nip, each shot of Trigger Happy can deal 9,999 damage if the user is in HP Critical status. Due to this, the Trigger Happy ability has the potential to be the strongest attack. This trick no longer works in the International or HD Remaster versions, as Cat Nip now includes Auto-Slow and Auto-Berserk. Yet, Gunner remains one of the best dresspheres, as its multi-hit abilities work well with any ability that modifies attacks. The player can thus pair it with Mortal Shock (adds Death to attacks), with a Stone Shock (adds Petrify) and System Shock (adds Stop).

Theif
Mastering Thief requires 1,060 Ability Points. There is no accessory or Garment Grid that allows the player to use Flimflam outside of the Thief dressphere. In the International and HD Remaster versions, Thief grants Mug to fiend-type creatures who possess the Attack command in their default command menu.
The Thief wields two daggers to deal two hits in one turn, making her useful for amassing chain. Thief's Steal and Flimflam skills allow her to steal items, money, HP, and MP from opponents, and inflict few choice status ailments as well. The Thief's Pilfer Gil is good early on to gain the gil to pay back O'aka's debt.
Warrior
Mastering Warrior requires 740 Ability Points. Swordplay can be accessed outside of the Warrior dressphere by equipping the Sword Lore accessory or the Pride of the Sword Garment Grid. Yuna has access to her Swordplay abilities through the Mascot dressphere.
The Warrior's Sentinel learned for 20 AP lets the use take less physical damage until their next turn (which is delayed). The user remains immobile until their ATB bar refills and all physical attacks cause only 1 HP damage, but full damage is still taken from magic. Its Assault casts Berserk, Haste, Shell, and Protect on the party and is learned for 100 AP after learning Sentinel.
Warrior learns only one auto-ability: SOS Protect. In the International + Last Mission and HD Remaster versions, creatures equipped with the Warrior dressphere gain SOS Protect and Power Break if they have a physical attack available.
Songstress
The Songstress dressphere is comprised of Lenne's memories.
Mastering Songstress requires 740 Ability Points. Songstress has two main commands, Dance, which applies an effect to either the enemy or player party which stays in place as long as the Songstress is dancing, and Sing, which increases the player party's stats. While dancing, musical notes appear around the girl and waves of light bounce around her in a circle. While singing, an upward swirl of lights and ascending musical notes appear. Dance and Sing cannot be accessed outside of the Songstress dressphere because of the animations used. Songstress has no means of attacking unless afflicted with Berserk or using the Mug command, whereupon Songstress attacks an enemy with her microphone, causing a small explosion with musical notes.
Both books of Magical Dances must be obtained as treasures in Chapter 5; Vol. I can be found inside the Den of Woe, while Vol. II is given to the party in Djose Temple after defeating the Machine Faction's Experiment machina at its maximum level.
Songstress has no auto-abilities.
White Mage
Mastering White Mage requires 750 Ability Points. White Magic can be accessed outside of the White Mage dressphere by equipping the White Lore accessory or the White Signet Garment Grid. Rikku has access to her White Magic through the Mascot dressphere. There are also Garment Grids that allow the user to use certain spells (i.e. Healing Wind, Healing Light).
Haste, Hastega, Auto-Life and Holy, despite being White Magic, are not accessible by this dressphere. Instead, they must be acquired by equipping accessories of Garment Grids.
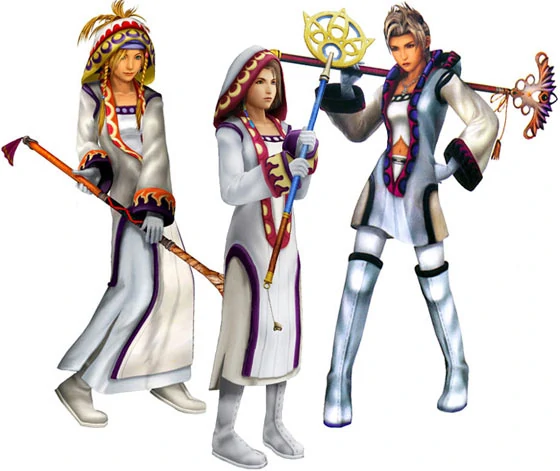
Black Mage
Mastering Black Mage requires 680 Ability Points. Black Mage can use Black Magic, Focus, MP Absorb, and Item. It has no Attack command, but can still attack physically with Mug. Focus raises the caster's Magic by three points every use, stackable up to ten points. It costs 10 AP to learn. MP Absorb requires Focus to be learned and requires 10 AP to master. It drains MP from the target.
Black Magic specializes in offensive magical damage, mostly elemental. Black Magic can be accessed outside of the Black Mage dressphere by equipping the Black Lore accessory or the Black Tabard Garment Grid. Paine has access to her Black Magic abilities through the Mascot dressphere. Other accessories allow the user to cast a corresponding spell (i.e. equipping the Red Ring allows the user to cast Fire). While the spells Flare and Ultima are Black Magic spells, they must be acquired through Garment Grids.
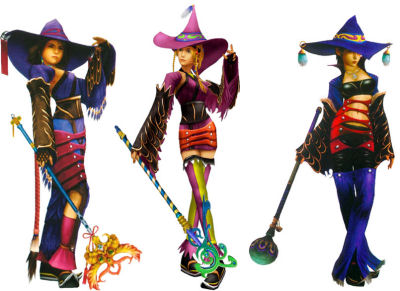
Gun Mage
Mastering Gun Mage requires 360 Ability Points and learning all 16 Blue Bullets. Because it requires a special weapon, Fiend Hunter and Blue Bullet cannot be accessed outside of the Gun Mage dressphere.
| Name | Learned From | Description | MP |
| Fire Breath | Balivarha | Deals fire damage. | 28 |
| Seed Cannon | Leukophylla, Cephalotus | Deals damage. | 28 |
| Stone Breath | Tomb, Monolith, Dolmen, Epitaph | Petrify cast on enemies. | 32 |
| Absorb | Protochimera, Haizhe, Baralai, Flan Azabache, Jahi, Cindy, Vegnagun | Absorb some HP/MP from enemy. | 3 |
| White Wind | Bully Cap, Coeurl, Queen Couerl, Mycotoxin, Ms. Goon | Restores HP, removes status effects. | 16 |
| Bad Breath | Malboro, Great Malboro | Deals various status ailments. | 64 |
| Mighty Guard | Garik Ronso, Haizhe | Shell and Protect on party. | 32 |
| Supernova | Ultima Weapon, Paragon | Damage to all enemies. | 70 |
| Cry in the Night | Mega Tonberry | Damage to all enemies. | 80 |
| Drill Shot | Baralai | Damage to an enemy. | 32 |
| Mortar | Gippal | Damage to all enemies. | 99 |
| Annihilator | Experiment | Damage to all enemies. | 48 |
| Heaven's Cataract | Kukulcan, Gucumantz, Chac | Lowers enemies Defense and Magic Defense. | 22 |
| 1000 Needles | Cactuar | Needle attack on an enemy. | 24 |
| Storm Cannon | Ironside | Damage to all enemies. | 38 |
| Blaster | Coeurl, Queen Coeurl | Damage to an enemy. | 30 |
Alchemist
Mastering Alchemist requires 2,249 Ability Points. Alchemist abilities cannot be used outside of this dressphere. In addition to Mix, Alchemists can use items without consuming stock via the Stash skillset. Stash has a longer charge time than the Item command, but once a Stash ability has been learned, the party member can use items through it in an infinite supply. Elixir from this skillset takes a whopping 999 AP to learn.
All items usable in battle can be mixed with Alchemist's Mix. There are a total of 4624 possible combinations with 53 outcomes. The Alchemist's Mix can be used at any time. Their support abilities enhance the effect of items and reduce charge time.
There is an in depth guide to their Mix ability here.
.jpg)
Dark Knight
The Dark Knight has the least amount of Ability Points to master it requiring 490 Ability Points. Arcana abilities can be used outside of the Dark Knight dressphere by equipping the Arcane Lore accessory or the Chaos Maelstrom Garment Grid. Yuna has access to Arcana abilities through the Mascot dressphere. Even though it is classified as Arcana magic, Dark Knight cannot learn Osmose. Osmose is instead accessible through the Covetous Garment Grid.
Spellspring can reduce Darkness's HP cost to 0, despite it being meant to apply only to MP costs.Dark Knight's auto-abilities immunize her to status ailments.
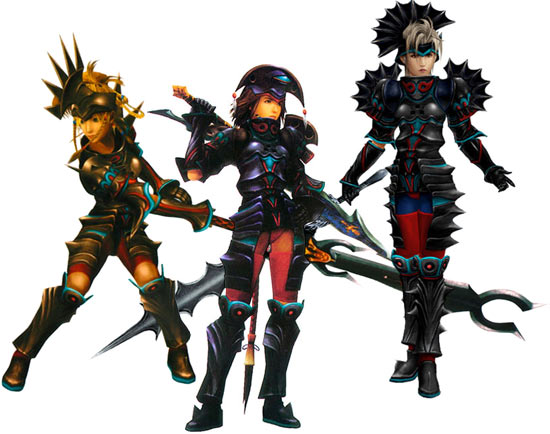
Samurai
Mastering Samurai requires 720 Ability Points. Bushido abilities can be accessed outside of the Samurai dressphere by equipping the Bushido Lore accessory or the Samurai's Honor Garment Grid. Paine has access to Bushido abilities through the Mascot dressphere.
Samurai learns Spare Change for 20 AP that damages opponents by throwing gil. Zantetsu costs 140 AP and may instantly kill an opponent depending on their Zantetsu vulnerability rating and independent of their vulnerability to ordinary instant death. Samurai's auto-ability is SOS Critical.
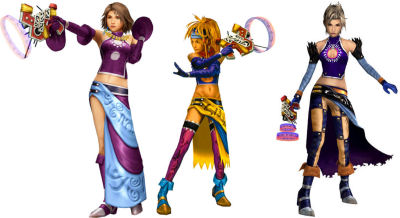
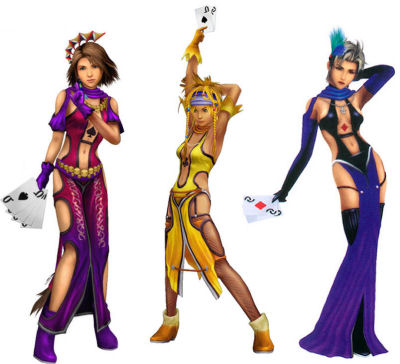
Lady Luck
Mastering Lady Luck requires 1,050 Ability Points. The Lady Luck dressphere excels in high Luck, aiding the player to achieve many critical hits. The dressphere is only above average regarding other stats, but is somewhat high in Strength. Lady Luck relies on player skill and luck, especially when using the Reels, which are the primary source of the dressphere's offense and defense. If the Reels fail at aligning to a correct combination, the player suffers from a Dud, which takes off 75% of the current HP regardless of the defense, though can be avoided if the player is invincible or has NulPhysical.
Guide to the Lady Luck's Reels ability can be found here. Also an in depth guide to obtaining Lady Luck by playing Sphere Break can be found here.
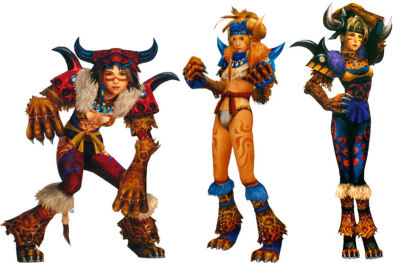
Berserker
Mastering Berserker requires 1,360 Ability Points. Berserker can use Berserk, which boosts the user's strength but causes her to lose control of her actions; several Instinct abilities; and Howl, which doubles the users' max HP. Instinct abilities can be accessed outside of the Berserker dressphere by equipping the Nature Lore accessory or the Blood of the Beast Garment Grid. Rikku has access to her Instinct abilities through the Mascot dressphere.
Berserker learns counterattacks and other auto-abilities that enhance her in battle as an autonomous fighter who cannot be controlled by the player while berserked.
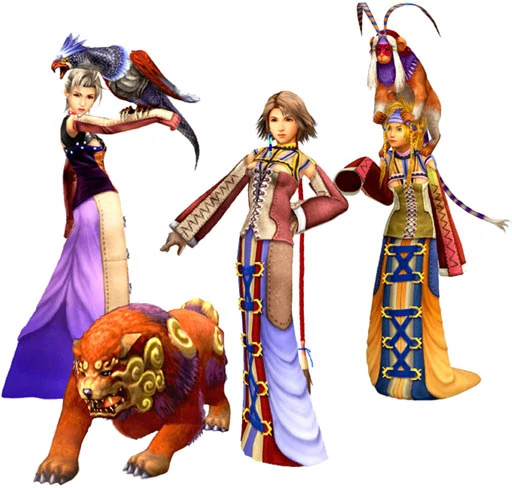
Trainer
Mastering Trainer requires 870 AP for Yuna and Rikku, and 900 AP for Paine. Because it requires a special weapon, there is no accessory or Garment Grid that allows the player to access Kogoro/Ghiki/Flurry abilities outside of the Trainer dressphere.
Each animal accepts different commands and performs different abilities. This is similar to releasing monsters in Final Fantasy V, except the monsters are permanent. To obtain the dressphere, Yuna must talk to and correctly respond to Kimahri in Chapter 2. He will give the dressphere to the party in Chapter 3 when Garik Ronso is planning to attack the Guado. If Yuna rests at the Celsius cabin at least once every chapter, in Chapter 5 a scene will occur and the player can rename the animals by talking to Barkeep.
Mascot
Mastering Mascot requires 1,559 Ability Points for Yuna, 1,599 AP for Rikku, and 1,399 AP for Paine. Each character has access to two out of six skillsets among the Warrior, Black Mage, White Mage, Dark Knight, Berserker, and Samurai dresspheres.
Each character's abilities are unique. Yuna's abilities focus on healing and buffing the party, and could be considered the ultimate White Magic command. Rikku's abilities are elemental and stat-reducing abilities. Paine's abilities cause status ailments on the enemy.

Festivalist
Each character has a different set of Festivities abilities and a different set of auto-abilities.
Yuna is the only one to have both physical and magical abilities on her dressphere ability list. Her abilities are unique in that the specific ability chosen is random, dependent on how the sandal she kicks off lands: the sandal landing face-up corresponds to the lowest level spell, face-down to the middle level spell, on its side to a high level spell, and on its heel to the highest level spell. If Yuna is petrified after tossing her sandal, the spell will still be cast. The lower level spells are more common, and the highest level spell is very rare. For Fire Sandals, the spells are Fire, Fira, Firaga, and Firaga 2. For Ice Sandals, the spells are Blizzard, Blizzara, Blizzaga, and Blizzaga 2. For Lightning Sandals, the spells are Thunder, Thundara, Thundaga, and Thundaga 2. For Water Sandals, the spells are Water, Watera, Waterga, and Waterga 2. For Flare Sandals, the spells are Sleep, Berserk, Break, and Flare. For Ultima Sandals, the spells are Silence, Blind, Death, and Ultima.
Rikku's Fish abilities summon three goldfish to attack the foe with the element chosen; these fish chain with one another, building on the damage the first deals.
The Festivalist is a dressphere in the International and HD Remaster versions of Final Fantasy X-2. Before the HD remake's release, the Festivalist was also known by the fan-translated name Festival-Goer. It is based on a design sent in by an eight-year-old fan for Square Enix's dress designing competition advertised in Final Fantasy X-2 Ultimania.

Psychic
Mastering Psychic requires 760 Ability Points. Psychic abilities cannot be used outside of this dressphere. During the player's first trip on board Celsius, Shinra will mention that he has completed his latest invention. The player must speak to Shinra and choose the Creature Creator option, which is highlighted in green. After the tutorial, the player must win the Standard Cup in the Fiend Arena to receive the dressphere as the reward. The Psychic dressphere can be obtained once per save file. As the game keeps track of how many times the Fiend Arena Cups have been beaten even in a New Game Plus, it is not possible to get duplicates. The same was true for the Adamantite in the original versions, but in the International version, it can be obtained infinitely, making the Psychic dressphere the only truly unique item.

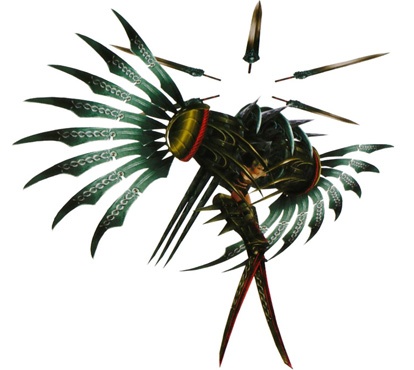
Floral Fallal
When active, Yuna can control the Floral Fallal as well as the Right and Left Pistils. Floral Fallal allows her to use the Fallalery skillset, and once unlocked (for 30 AP), the long Great Whirl ability that damages all enemies. The Right and Left Pistil can use Right Stigma and Left Stigma respectively, which are basic physical attack commands, as well as the Right Pistilplay and Left Pistilplay skillsets.

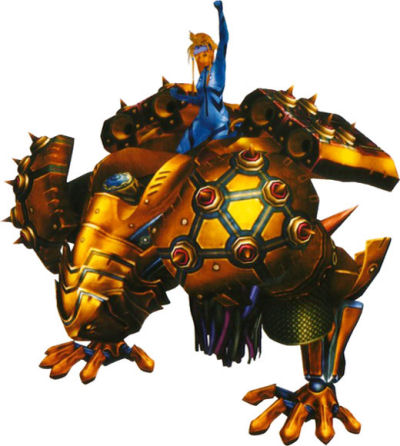
Machina Maw
Full Throttle
When active, Paine can control the Full Throttle as well as the Dextral Wing and Sinistral Wing. Full Throttle allows her to use the Throttle, and once unlocked, the Fright and Sword Dance abilities (costing 20 AP and 30 AP respectively). Dextral Wing can use the Dextral Arts skillset while Sinistral Wing can use the Sinistral Arts skillset, and both can use Stamina and Mettle abilities, and once unlocked for 10 AP, Reboot. All three use the same auto-abilities.
Crimson Spheres
Crimson Spheres are key items in Final Fantasy X-2 used to gain access to the Den of Woe at Mushroom Rock Road. They are distinctly red movie spheres that chronicle the story of an ill-fated Crimson Squad squadron two years before the game events. Collecting the spheres is optional but adds to story completion percentage. Some spheres, if not picked up at the right time, are permanently missed. The recordings can be viewed in the menu under Treasure Spheres. The first eight are called Crimson Records while the last two are called Crimson Reports.
During the Crusaders' Operation Mi'ihen Maester Wen Kinoc sent a group of aspiring Crimson Squad members into the Den of Woe under the guise of a final test. A malevolent spirit residing in the den possessed the candidates who killed one another with only one group escaping: Nooj, Baralai and Gippal and their sphere recorder, Paine. After they failed to provide useful information on the visions of a giant machina, Kinoc ordered them executed to cover up the incident. The four escaped and Kinoc ordered the den to be sealed.
Two years later the Gullwings stumble upon the den and find Ormi and Logos, their rival Leblanc's henchmen who once worked for Kinoc. The two are trying to open the seal via various spheres but flee upon noticing the Gullwings. They leave behind a Crimson Sphere, part of the set of spheres Paine had recorded. The Gullwings will need to collect all ten to release the seal. Paine feigns ignorance on her part in the Crimson Spheres' creation.
The Gullwings return to the den after relinquishing the Awesome Sphere to either Youth League or New Yevon, and meet Nooj outside the den who gives the party another Crimson Sphere. Paine is annoyed Nooj insists she take the sphere.
The Crimson Spheres are the records of Nooj, Baralai, Gippal and Paine's experiences while training for the Crimson Squad. Locating all ten allows the party to explore the den. They find it filled with the pyreflies that have kept Shuyin in a semi-corporeal state for a millennium, fueling his anger and grief. Rikku and Paine are possessed by Shuyin who shows Yuna how he and Lenne died, and summons the images of Nooj, Baralai and Gippal to fight Yuna. Yuna dispatches the illusions and breaks her friends free and the trio escapes the cave.
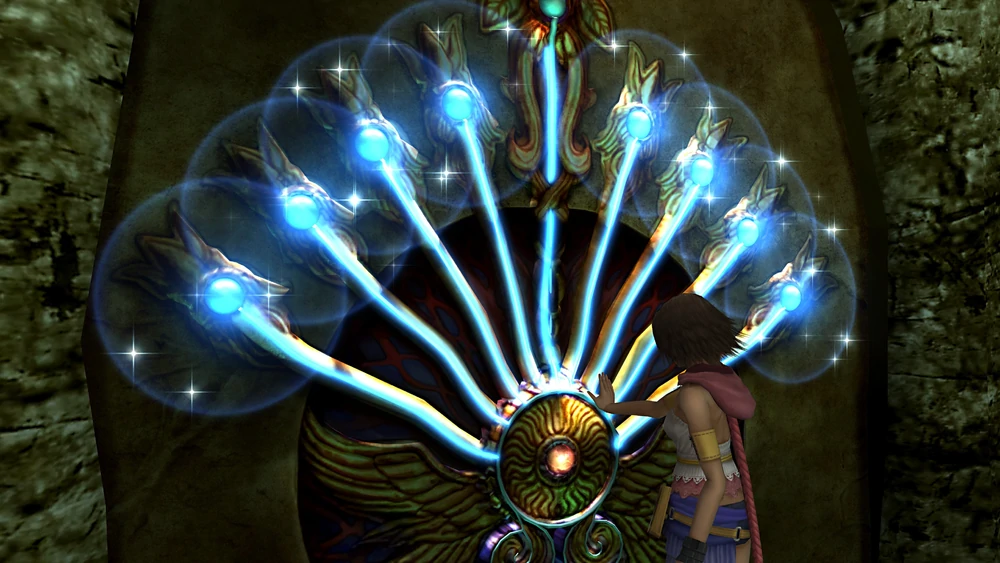
Yuna unlocking the Den of Woe.
Crimson Sphere 1
The chronologically first recording is found in Bevelle Underground following the meeting between Nooj, Baralai, and Gippal in Chapter 3. The player must return to where they fought Bahamut after Djose Temple becomes a hotspot. It is found on the floor after defeating the Malboro. The sphere is permanently missable if not found before completing all the chapter's hotspot locations. The recording shows the squad in Bikanel desert during a drill operation. Baralai asks why Gippal is trying out for the Crimson Squad even if he is an Al Bhed. Gippal answers the Al Bhed want to protect Spira too and he had always wanted to be a Crusader, who don't accept his ilk in their ranks. He posits no one can wield a machina weapon better than an Al Bhed. Baralai is nervous about using machina even if the maesters seem to be fine with it. Nooj tells the two to be quiet and Gippal turns off the sphere recorder. As the recording resumes, Baralai is amid introducing himself as a man from Bevelle. Gippal reprimands him for a bad timing for introductions as they are amid simulated warfare. When Nooj tells the others his name they are impressed. The recording ends just as Baralai asks for the recorder's name.
Crimson Sphere 2
The second recording is obtained in the Farplane Abyss, given by Nooj and Gippal following the battle with Ixion in Chapter 3. The sphere shows the squad fighting fiends on the desert. They are surrounded and run out of ammo. Nooj approaches the fiends which are killed by the recorder, Paine. Nooj is annoyed and Paine says she had heard he is looking for a place to die. Nooj laments it is actually quite difficult to achieve and Paine says the Crusaders don't soon forget "Nooj the Undying". When Paine asks why Nooj wants to die he says it is his life to throw away.
Crimson Sphere 3
The third recording is obtained at Farplane Abyss from Nooj and Gippal following the battle with Ixion in Chapter 3. The sphere shows the boat trip where Gippal and Baralai talk about the upcoming Crusader operation at Mi'ihen to kill Sin with a machina weapon. Gippal thinks it will work. Baralai fears technology that is powerful enough to kill Sin, but Gippal says that machina itself is not dangerous. They talk about their plans for the Calm. Nooj thinks it will be dull and the others laugh at how he seeks excitement despite having been ready die during their previous mission.
Crimson Sphere 4
The fourth recording is found in Guadosalam in the hidden area of Chateau Leblanc in either Chapter 3 or 5. At the hidden passageway, the player needs to enter the room with a circular door and climb the boxes to find the sphere in a chest at the end. The recording shows Kinoc briefing the groups ready to investigate the dangerous Den of Woe. Survivors are promised to be officially admitted into the Crimson Squad. Kinoc doesn't supply enough weapons for everyone and says that securing one will be crucial to pass this final test. Gippal lunges toward the weapons and falls over. When the recording resumes Nooj, Baralai, Gippal and Paine are in the den surrounded by pyreflies, all out of breath. Other squads are screaming and killing each other.
Crimson Sphere 5
The fifth recording is gained on the Celsius from Leblanc in the Engine Room, following Yuna's concert in Chapter 4. It is missed if the player doesn't visit the Engine Room at the end of Chapter 4. The recording shows Crimson Squad aspirants killing each other in the Den of Woe. Gippal and Baralai wonder what is happening. Nooj thinks this effect is the "dangerous" part of the investigation Kinoc had mentioned. Baralai throws down his gun, saying he wants no part in a group whose members kill each other. After two more aspirants shoot one another, Nooj picks up their weapons and walks onward alone, accepting Baralai's decision to quit. Gippal tries to stop him. Nooj walks up to a pair of fighting aspirants who kill one another. Pyreflies emerge from the bodies and form a dense green cloud that engulfs Nooj. He starts to writhe and points his gun at Baralai. Gippal points his gun at Nooj's head, telling him to lower his weapon. Baralai points his gun at Gippal telling him to put his gun down. All three are engulfed in dark energy and surrounded by pyreflies. Paine runs to the middle of the triad asking them to stop. The three lower their guns and turn to look at their recorder.
Crimson Sphere 6
The sixth recording is found in the bonus dungeon of Via Infinito's Cloister 0 in Chapter 5. It is obtained when the player enters Via Infinito the first time. The record shows Nooj, Gippal, Baralai and Paine having escaped the den and Yevon officials asking what they saw in there. They explain the den's swarming pyreflies made everyone violent that led to a killing spree. They talk about an apparition of a colossal bestial machina. When the apparition got inside of them it had made the squad feel fear, regret, despair and sadness. Gippal describes the sensation as someone's raw emotions taking over his brain. The Yevon officials tell the four have graduated and to go protect "the maester" until Operation Mi'ihen is complete. The four celebrate, but as they leave Paine yells at them to run and the Yevonites open fire at them.
Crimson Sphere 7
The seventh recording is obtained outside the Den of Woe from Nooj in Chapter 2. It is missed if the player doesn't visit the Den of Woe in this chapter. The recording shows Paine running frantically through a dark pyrefly-swarming beach calling out to her missing squadmates.
Crimson Sphere 8
The eighth recording is found in Via Infinito's Cloister 20 in Chapter 5 after defeating Aranea. The recording shows the exhausted Nooj, Gippal, Baralai and Paine have made it to the Rin's Travel Agency on Mi'ihen Highroad. Nooj is happy everyone is fine and Paine wonders if he is mad as she kept him from dying. Paine explains she followed the guys because she wants to know what they saw in the den. Baralai says they will tell her once they figure it out themselves. Nooj predicts the maesters will want to kill them and that they should go their separate ways. Nooj tells Paine her job as the recorder is done and turns down her recorder. As they part ways Paine decides to take one last footage for "old times sake" and catches a suddenly pyrefly-covered Nooj shooting Baralai and Gippal and then turning fire on her, breaking her recorder.
Crimson Sphere 9
The ninth recording is obtained outside the Den of Woe from Ormi and Logos in Chapter 1, starting the sidequest. It is permanently missable if the player doesn't visit the Den of Woe in this chapter. The footage shows the bodies of the dead Crimson Squad aspirants in the Den of Woe being recorded by Ormi and Logos. Ormi says no one survived the expedition but is berated for not counting the bodies correctly.
Crimson Sphere 10
The final recording is found in Guadosalam in Logos's room in Chateau Leblanc in Chapter 2. It is obtained as part of the storyline. The final sphere footage again shows Ormi and Logos recording the results of the Crimson Squad selection expedition. A Yevon official says there are three candidates and their recorder missing from the numbers of the dead, which means they must still be alive, and tells Ormi and Logos to go "fix it".
CommSpheres
CommSpheres are a communication device created by Shinra in Final Fantasy X-2. In appearance, they are identical to the Al Bhed Compilation Spheres seen in Final Fantasy X. Dialogue heard using the CommSpheres often counts toward completion percentage and viewing scenes in certain areas is required in order to obtain Episode Complete status for those areas.
Almost all CommSphere scenes are optional, though brief use of them is required at the beginning of Chapter 4 as the party checks on what's happening with Spira's leaders. One of the CommSpheres first appears on the bridge of the Celsius toward the beginning of Chapter 3 and Shinra explains that it can't be used until he sets up a Spira-wide network on the ground. He then does so as the party visits various areas during Chapter 3. If a location is not visited during this chapter, then a CommSphere is not placed there. Shinra also develops a mobile CommSphere that can be sent into remote areas.
The player can view CommSphere scenes in Chapter 4 before and after recruiting Tobli to organize the Thunder Plains concert. At the end of Chapter 4, most of the CommSpheres have broken.